Thursday 3 December 2020

Colour Overload - RHS Wisley Glow 2020

 We got to visit the Wisley Glow event this year (just at the end of lockdown), and having been to a few others in the last few years, this was no disappointment.  None of the tacky Santa and Reindeer stuff that was a huge part of Kew one year, but plenty of changing light patterns, repetitive music etc.  Quite crowded, with many small children, a one-way system and ropes everywhere, so a healthy dose of patience required........I am not selling it to you am I?!?  It was a welcome distraction from the never ending lockdown though.

It's been a very quiet year for Catchlight 35, not surprisingly with the pandemic, and quite hard in all sorts of other ways too that no-one had expected for many people.

So dust off that camera, out with the tripod, turn down the ISO and use remote trigger for varying long exposures.  After that, shoot to stack and lose the people!  I think the minimum exposure time for any of my shots was 6 seconds, but mostly they were 13 to 30 seconds or more.  You need a relatively windless day so I was lucky.  Enjoy.


This is lit with my own torch for the statue in the foreground - most people may have missed this since it was pitch black just here.


This is a stack of around 8 shots, for different lights on the trees/balls and needing different exposures depending on the colour of the lights.  It is beautiful just to stand there and watch the colours change, but you only get the full impact in a photo with a stack.


I have only put a few here, but you get the idea.  Then there are the ones you took by mistake when moving the camera.......


OOPS!  Very abstract.......!
This is what happens when its dark and you either press the shutter by mistake or you touch the touchscreen on the camera (more likely, having forgotten to switch off touch ability) whilst picking up the tripod to move on.


Tips:
As I've said before in an earlier blog, the dark is your enemy when trying not to lose any bits of kit so have a load of big pockets to drop lens caps/hoods/batteries etc into.  Hopefully you'll find everything at the end. 
Avoid tripping up small children, or them tripping you up...
AND KEEP WARM!

P.S  Then there's the overlay experiment....double exposure.  Hmm......


Filter Attachment Systems - which is best?

This blog was written to draft about 2 years ago so there will be newer filter systems around now I guess, but the principals remain.  Have H&Y even survived?  I don't know, since lockdown in 2020 prevented the Photography Show in Birmingham from happening this year and this is where one gets to take a gander at all the latest stuff and nonsense......
The bottom line is that filters are a Faff!  I tend to only take them out with me when I'm either on my own (and can take as much time as I need) or with like minded photographers who are all  lingering around in one area for some length of time.  Otherwise your companions get very bored very quickly while they wait around for you.....
The most useful one for ordinary use is the CPL but there is plenty of creativity to be had out there if you can be bothered to cart it all around with you.

So you decided to expand your photographic creativity and skill and think you would like some filters.  The first thing I did was buy some (relatively) cheap filters 100x100 and some kind of filter holder.  I set out with the following starter set:
Standard Cokin filter holder with set of different step rings for different thread lenses.
Cokin 100x100 - these are not glass, but do the job.
ND4 soft grad
ND6 soft grad
ND8 soft grad
Hoya Pro CPL  (Circular polariser)  There are cheaper ones than this one.

I found out very quickly that ND8 soft grad and CPL were the ones I used 98% of the time.

This will make you realise if its worth investing in a decent set.

I progressed to buying a Tiffen ND Fader 1 - 10 stop.  This is a special filter with two polarisers, which, when twisted together block out a variable amount of light across the whole lens. Great for allowing slower shutter speeds to smooth out water/show movement etc.  It has its drawbacks though.  The infamous X at the extremes, which means that it is really only about 7 or 8 stops ND in reality.  To be honest I haven't used it that much.  It's fun to play with but you need time.

Having decided that filters are the way to go if you
a) have time to mess about in every location,
b) can be bothered to carry it all around with you,
c) have learnt not to drop it(!),
 I did much research and forked out much hard earned  money on some Nisi filters.  There are many blogs written about the colour rendition/quality etc of all sorts of makes if you dig around nowadays so I won't go into it, but as a general rule, none of the highly recommended ones are cheap (around £150 for a soft Grad 100x150).
At the time, I chose Nisi for it's superb colour rendition and glass quality of their filters (still true today) but also for their (at the time) revolutionary holder system which had an integrated cpl filter (removeable) in the filter holder which meant much less fiddling around getting the cpl right and then having to add the grad filter after. 
With the cheap Cokin starter set, every time one switched from landscape to portrait, one had to mess around adjusting the cpl and then re-adjust the grad again.  With this system one can adjust the cpl without affecting the grad.  Now (as at 2019), Nisi is several system versions later (all slightly improved, supposedly, but way too expensive to upgrade what I had) and there are plenty of other makes doing similar things some of which are now magnetic (H&Y for example, which I am following with interest as I can use my existing superb Nisi filters with it).

One thing to bear in mind is that if you really get into this photography thing, you may end up with several lenses and some need larger filters.  Try to future proof your filter system as far as possible.
I very soon discovered that 100x100 is not large enough for most lenses and when I reinvested, I bought 100x150 glass instead.  I can use this on my Irix wide lens (just), although I have had to buy a special larger NiSi cpl for this lens.

Another thing I have learnt from my filter buying journey is that one shouldn't necessarily rush into the latest revolutionary filter system until they've been out awhile (hence I'm waiting with interest for H&Y).  I bought the Nisi V3 filter holder, which is fine and was one of thier first versions.  It came with  no pouch/case (so it was just loose), and no lens cap, but when you want to travel and leave your cpl on the lens, your standard lens cap doesn't fit so you either have to remove the filter or invest in a separate threaded cpl filter just for that lens (no cap available for the V3).   Hmm, when I approached NiSi with this problem and suggested that they make a lens cap for it, they just brought out the next version of the filter holder and suggested I buy that instead (£150+.....!)  Er.....no.  So I talked them into donating one of their new lens caps (for the V5) to me which I had to file away the sides of slightly to make it fit my S3 holder.  Not ideal, but a work around.  There is now  V6 holder which has round sides (unlike the V5 but like my V3) and has a lock screw (whoopee, not).  I'll stick with the V3 I reckon now that I have a lens cap.

H&Y is interesting because it is similar to NiSi (with built in cpl) but the whole system is magnetic.  One can buy a frame for your current NiSi filter, which saves you touching any part of the filter when handling, and then it simply sticks onto the holder.  Subsequent filters stick to each other.  I have yet to see if this is sensible/practical but it sounds like a good idea and would be much easier to handle.

Saturday 27 April 2019

Awesome Iceland Update as at 2018

Well.................5 years later we returned to Iceland.  What a change.  Entirely different now.  Weather worse than ever imaginable and we had planned to drive to the limit of our last trip along the south coast to start exploring further.  So we drove straight out of Reykjavik and all the way to Vik.  Here's a map of where we went this time.  Bear in mind that this was a 5 full days trip so many miles have been covered.  Most short tours don't even get as far as Vik.


1. Dyrholaey Lighthouse
2. Reynisfjara Beach
3. Svinafellsjokull Glacier
4. Solheimasandur Plane Wreck
5. Geysir
6. Faxafoss
7. Skogafoss
8. Seljalandsfoss
9. Oxararfoss
10. Urridafoss
11. Solheimajokull Glacier

We left the main road to have a quick look at the Reynisfjara beach across the lagoon (just short of Vik) as we were passing - gone was the dirt track with ice lapping at either side - now it was a two lane tarmac road with coachloads of tourists, a cafe on the headland and all the edges of the cliffs roped off.  SO disappointing.................... but then it is a stunning spot and tourism was bound to find it eventually. We just didn't realise that they hadn't found it yet, back in 2013. We were so horrified that we didn't even get out of the car.

We drove up the rough track to the Dyrholaey lighthouse, by which time the weather was hurricane force wind and horizontal rain.   So bad that it did occur to us that our 4wd vehicle might not stay in the car park.  We tried to make the short trek to the lighthouse holding onto some ropes against the weather, but decided that it was pretty dangerous up there and headed back.  Two of us were required to open a car door to make sure it didn't get ripped off its hinges by this time.   Weather getting worse!


This is the view from up by the lighthouse looking west along the coast.  It's hard to tell exactly how grim the weather was from this.......not many pics taken, needless to say.

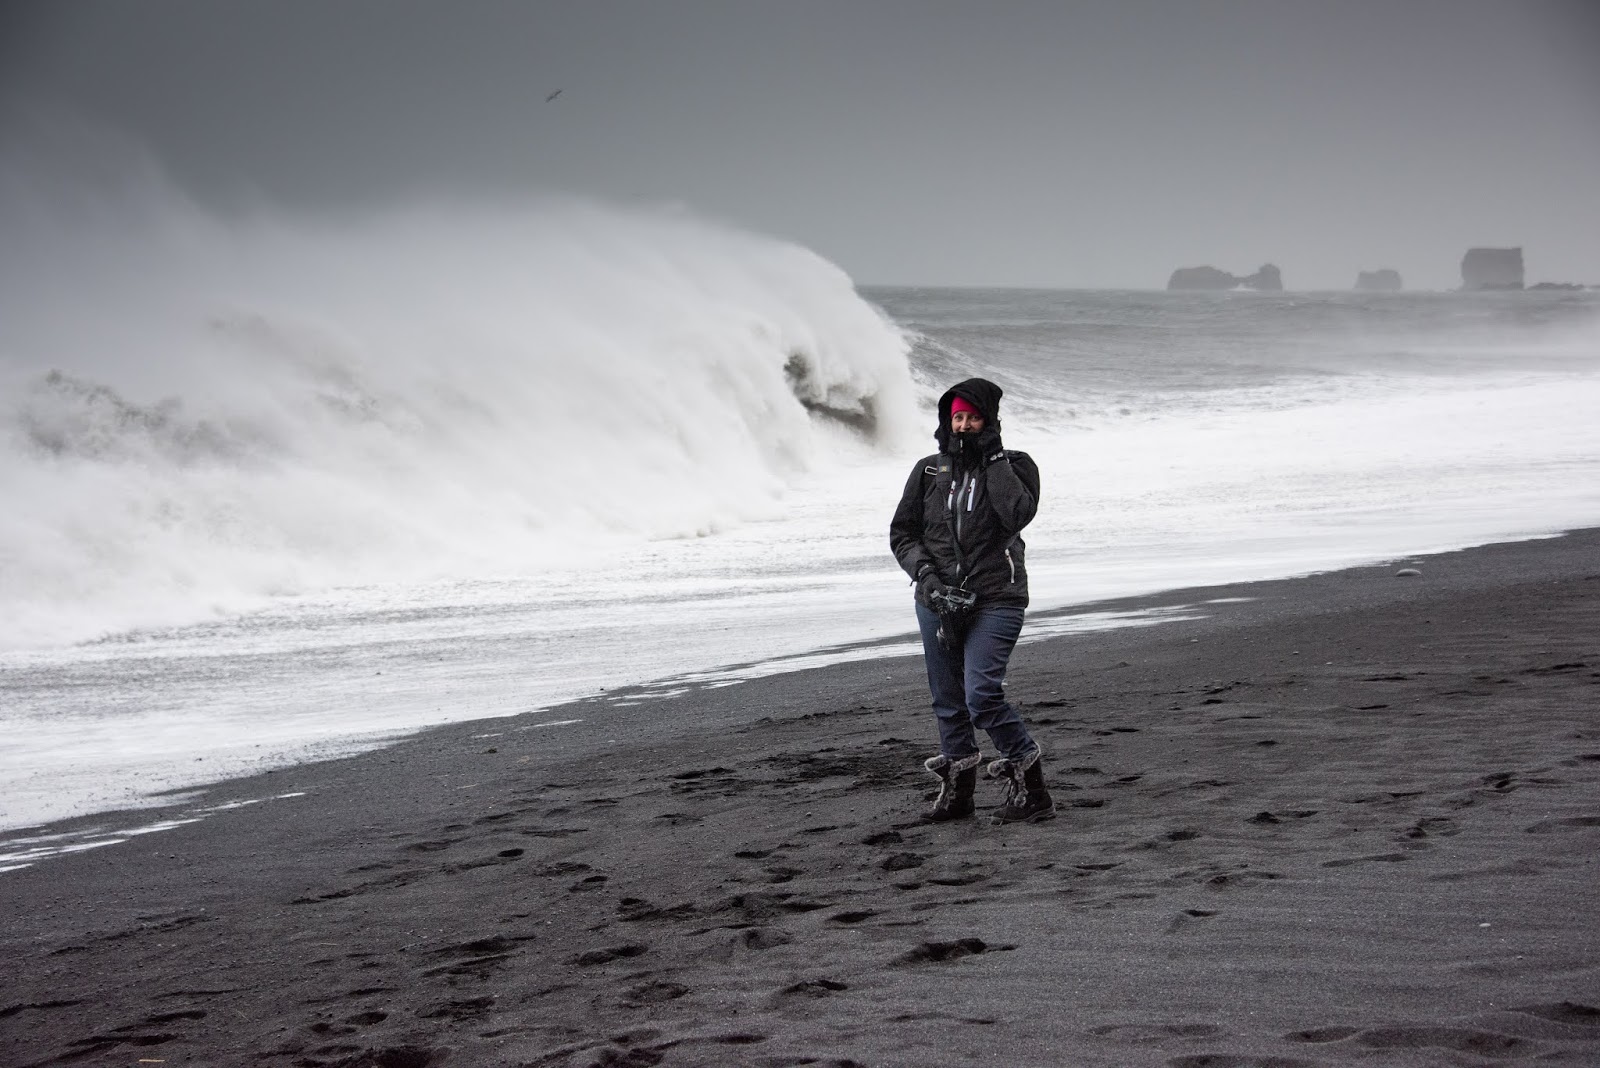
We then headed back to the main road, and down the next road right, down to Reynisfjara beach itself with the basalt rock formations.  Again, cafe in car park, coachloads of tourists etc etc.  Wind now so strong that it's picking up stones and sand and hurling it at us.  Still coachloads of tourists, on a coach tour presumably, determined to get that selfie with the selfie stick whilst being stoned alive with a hundred other people.   Note to self here.......selfie sticks in a crowd not good, selfie sticks in a hurricane not good either.  You had to feel sorry for them though as this was their only chance.  Pretty unpleasant.


So, not in any particular order we headed off further East along the main road, past our farthest point reached before on the last trip.  Weather came and went, more came than went to be honest, but the landscape around each new headland was always different every time:


Weird little heaps of lava rock amongst the snow/ice....


Moss covered lava flows (?).......


Yet another headland......................still grey sky though....

Then we encountered a black desert landscape with an impending sand storm......

We were warned on picking up the hire car that damage from sand storms to the paintwork was chargeable...............yikes!  Luckily it wasn't as bad as it could have been, but you still wouldn't want to getout of the car into it.....

Looking inland.....


Looking west back to the headland.............

What most people maybe don't realise is the vast expanse of nothingness that is encountered here.  Interesting nothingness, but miles of it.

Nearer along to Hof, we headed down an extrememely potholed but quite wide dirt track to Svinafellsjokull Glacier.  Now this is much less on the tourist track, hence no tarmac (yet) but is quite amazing up close even when, yes, still raining quite hard.


We continued all the way along the coast to the Jokulsarlon glacier lagoon in the hope of seeing icebergs on the black beach and had a night photographic guided trek to an ice cave planned.  This wasn't to be as the weather was so bad and snowing by this time that the trek was cancelled and although we got to the lagoon, there were no icebergs and really not alot of visibility either so we changed our plans and headed back towards home again having switched our hotel stays around also.  Very disappointing as this was what we really came to see.  Just unlucky I guess, which is how Iceland can be, so be warned.

Heading back past Vik again, and we decided, regardless of weather (still raining a fair bit) that we would trek out to see the plane wreck at Solheimasandur.  It starts like this.........where is it?


It's a 3km walk, flat and exposed.  So carrying 15kg of camera gear on your back is quite tiring.......


......and when you get there, doubtless a herd of other tourists.....


but here's what I came away with..... a stacked image to lose the tourists busy etching their names into the side of the plane(!!) and any quad bikes kicking around that some people must've hired somewhere (who knows where though).


Not something you see every day and not much left of it either.  It crash landed in 1973 and bits have been going missing ever since.......

Me trying to dry off the camera storm covers in a brief lull in the rain.  Gill and I at the Plane wreck.


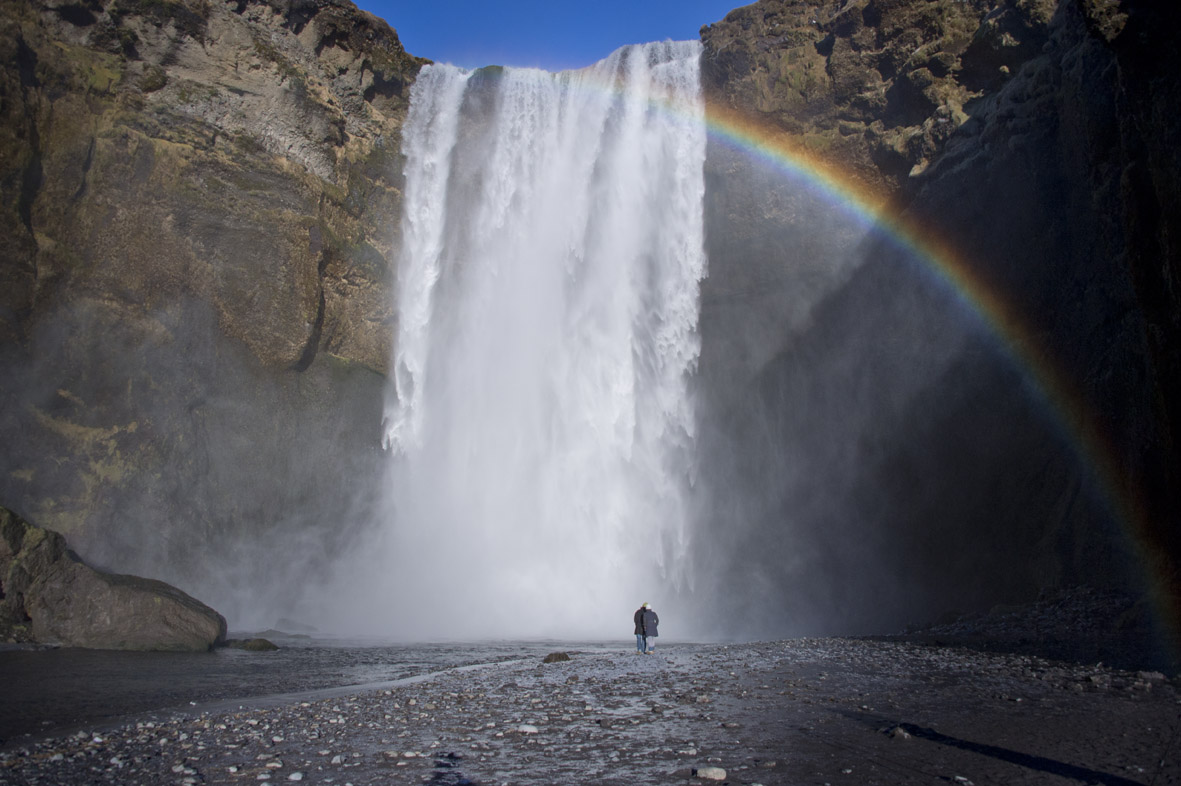
Finally heading back from the wild west and wild west weather (is that normal? I don't know),  we had a spare day on our hands so dropped in on Skogafoss and Seljalandsfoss (as we were passing, and they're right by the road), only to find that the car parks are chargeable and they are both fairly roped off now due to too many tourists.


We then revisited Geysir.


 Not very much has changed here as there was always a big cafe and shop/car park/tourists etc.  Geysir still erupting every 7/8 mins.  Still spectacular, and the weather had finally improved....

....we were beginning to tire of it.

In this area, not far is Faxafoss, yet another waterfall.


Now we're just listing waterfalls..............you get a bit waterfalled-out after a while but they're all different and all beautiful in their own way.

Oxararfoss:


Urridafoss:


Solheimajokull Glacier - where quite a few glacier treks go to.  It was hammering down here and Gill didn't even leave the car.  I braved it for 10 mins to take a quick panoramic set with a phone, and I got soaked!


SO there it is - another Catchlight trip blogged for the record, although far from a great one due to the weather, but what can you do?  Iceland is a beautiful place and quite colourful in the sunshine, but mostly shades of dark grey otherwise and only for the severely weatherbeaten and determined.......

In 2013, you had to plan where to get the next lot of fuel/food/hotel way in advance (a year ahead mostly) as they were extremely few and far between and one could easily be stranded in bad weather, but by 2018 much of this has changed.  Now one can book a last minute flight/hotels etc.  There are hotels appearing everywhere.  The Fosshotel Glacier Lagoon we stayed at near Jokulsarlon (very nice it was) was not even on Google earth view from the road so it was new.  Where to find lunch is now not a problem mostly whereas in 2013, if you didn't take it with you, you went without.  The downside is that there are 100-fold (no exaggeration) more tourists everywhere you go with cafes and car park charges and ropes everywhere too.  Ah well, it's still worth a trip, just don't expect it to be all to yourselves anymore.

Tuesday 3 February 2015

How did I do This?

Something to do on a very dull,wet or snowy day..............

Here it is............the fast car..........how?


Well not with loads of expensive equipment like a fast car, an expert driver, a bolted on metal arm with camera attached etc etc, at speed, which is what I might have guessed at.

MUCH simpler really, if you know how.  Photoshop CC (although I'm fairly sure you can do the same in Photoshop CS5 and CS6).

Starting image:

Completely static car in Mercedes Benz World showroom.  No danger, no well paid driver, no studio lights, no flash, Nothing - just me and my dslr and a few people wandering around.   Also a pretty standard and dull image, apart from it being a great car of course.

So............let's liven it up a bit:
1. Open jpeg in Photoshop CC.
2. Select carefully the car (with your favourite selection tool)
3. Select Inverse and apply Radial Blur Filter with Zoom.  Adjust blur centre towards rear of car.  Play around with the amount of blur to get the look half believable.
4. Duplicate this layer. On newly created layer, delete current selection and make a new selection of the wheel/tyre(excluding the centre of it).
5. Apply Radial Blur with Spin.  Again adjust centre and amount.
6. Duplicate THIS layer and select latest layer. Clear selection and make new one of the windscreen.
7. Apply Radial Blur with zoom.  Play around with settings as before to make it look good.  This takes a few gos at it when you first try but you get better at it.
8. Repeat No 6 but select side windows.

Clear as mud?  Have a go.


Sunday 24 November 2013

Painting With Light Landscapes

I've always loved this.  It's different on every outing and there's just no set way of going about it - it's predominently trial and error.  There are two ways of approaching it:

1. Take plenty of images from the tripod, each with different parts of the scene lit up in the way you want them. Blend after in Phtoshop.  Pros: You have more time in each image to get it right without worrying about the exposure being too short.  Cons: Some parts of your scene may overlap and this makes it hard to blend afterwards in Photoshop.  It works for some scenes and not others.

2. Aim to get the image perfect right out of the camera.  Pros: Almost no post processing.  Cons: You may never get the perfect shot and you won't realise until you get home.

      Nikon D90   35mm   f8  2mins 30 secs   ISO 200  and powerful torch.

What is most fascinating is what the eye doesn't see but the camera does.  The image above was taken in the pitch dark at midnight on Bookham Common with a torch.  The reason for the sky being a bizarre colour is because there is full cloud cover and clouds reflect the lights of nearby towns, presumably in this case Cobham, sending them into oranges and reds/pinks depending on the height of them and reflecting nicely in the pond.

You can use any kind of lighting that you have to hand, but in the case of this landscape I needed an exceptionally powerful torch.  As with the inverse square law, the further away the subject, the more lighting power is required, and part of the guesswork with these images is judging how much time to leave the torch on different parts of the scene in order to keep it evenly lit.  This is something you can only learn by experience.  This image is straight out of the camera.

Technique:
1.  Use a tripod and some lights (torch, flashguns etc)

2.  Use the torch to prefocus the lens in auto focus, then switch the lens to manual focus to prevent it trying to refocus when you open the shutter.

3.  Set your aperture according to depth of field required.

4.  In Bulb mode shoot one or two (or as many as you need) without any light to gauge the ambient lighting. This will vary enormously depending on moonlight, cloud cover, nearby towns, any man made lighting in the scene.  Now you have your shutter exposure time.

5.  Use either a cable release or remote shutter release to prevent camera shake.  I use a Hahnel Giga T Pro II  as I can then set the exact length of time I want the shutter open and it will close automatically.  The trouble with remotes or cable releases is that you need to return to the camera to close the shutter, and that's not as easy as it sounds if you are out in the black of night and have moved somewhere else in order to light the scene.  It's suddenly quite hard to find your tripod at all - why are they nearly all black??!!   Obviously you can't use a torch to find it, or the camera will "see" you.

6.  Wear dark clothes and keep moving if in view of the camera and then it won't see you.

Nikon D90  35mm   f13  ISO 200     61 secs

This is one of my earlier experiments.  Not quite dark, I had very little time to run round and shine my torch from the top of each headstone.  Not expertly done either, but not a bad attempt.


7.  If at all possible choose the right weather - even a very slight breeze will cause the trees to move in the long exposures, so pick a still night or a static subject.


       Nikon D90  18mm   f11    124 secs  ISO 100   torch

With this length of exposure, the clouds move, often giving interesting images.

      Nikon D90   13mm   f8   59 secs    ISO 200    torch

       Nikon D90  18mm    f8   192 secs   ISO 200   Torch


      Nikon D90  18mm   f7.1   20secs  ISO 200    torch and flashgun

Normandy WW2 Gun emplacement on the cliffs - The moonlight in this one was very bright.  I used a combination of the torch and hand held flashgun (you can tell by the shadow of the gun barrel that there were two light sources)  as there was not enough time otherwise.

Other things to note:
Don't put any of your equiment down anywhere, you may not find it again.......or you may tread on it!
Preferably take a friend with you for safety and let someone know where you're going.

As you may have guessed, I usually pick the second of the two approaches trying to shoot the perfect image straight out of the camera.
Above all stay safe and have some fun with it!

Sunday 23 June 2013

Awesome Iceland!


This year's Catchlight trip went to Iceland and having received warnings about bleakness, weather phenomena, isolation risks etc, we went into heavy research  mode beforehand.  All I can say is that I recommend you don't go on one of those pre organised coach tours.  Yes, you'll see a few of Iceland's most accessible natural attractions, but only with around 30 other people for a limited time at each place.  We  realised that if we wanted to take a million photos, we needed to be at our own pace and timing and then hopefully we could also find some slightly different places to squeeze into our very short trip.  The main intention was to see the Northern Lights, but we already knew that one has to be lucky and the Aurora Forecast was not hopeful.

Arrival in Iceland in early February was the 100% bleak outlook we had expected....................
the view from the plane......not optimistic...........
Little did we know but it was the start of a winter storm.  By the time we picked up our hired 4x4 with spiked tyres, we had to dig it out of the car park.  Check it for dents/scratches?.....not a chance, it was blowing a horizontal blizzard and the car was invisible.

Well, we thought, we've been out in some pretty bad weather in the Alps before now, and we kind of know what we're doing...............we couldn't have been more wrong.  We had been warned that it might be tricky and had come prepared with blankets and food/water on board, never thinking that we might have a problem.
Our destination for the first night was the Hotel Ion in the middle of the national park miles from anywhere.  Already knowing that the main route was closed, we had route B planned and ready and the Sat Nav prepped.  The Sat Nav was absolutely no help at all for some reason and became very confused almost instantly.  We had a map, but once you're out in the pitch black, no other cars, horizontal heavy blizzard blinding your view any further than the front of the bonnet, it was impossible to even find a road sign, let alone read it.  It was all we could do just to stay on the road.  As the weather became seriously worse, we were at walking pace and starting to climb so the temperature was dropping further.  If either of us had thought of it, we really should  have taken a picture of our view from the car, which would have been a wall of horizontal white streaks immediately in front of the car in the headlights.  It was hard to believe it could be so bad. To be honest, although neither admitted it at the time, we were actually frightened and made the decision to turn back and find a place to stay in Reykjavik, the only problem was that we couldn't actually see if there was enough road to turn around in if we could see any part of the road at all at this point!  It occurred to us that we may be spending the night in the car and finally we said that we didin't care how much it cost, we needed to put on the gps on the iPhone and find out exactly what our situation was.  It was a while before we came across a small road coming in from the right and decided to take a chance and try to turn around.  Lucky we had waited to find a turning as we discovered two days later that the road we were on had a deep drop in the centre of the road with a tall wire fence in it, none of which we could see at the time.  We had actually been on the wrong road and, later on, having found the correct one, limped very slowly to the hotel only 5 hours late and slightly brain frazzled!


We woke to find the weather still snowing, and dressed in our ski gear ready for the Arctic, we set out on our planned itinerary.  Gulfoss and Geysir here we come.........we said bah! to the weather and were determined to see it as a challenge.  Sometimes you just gotta go with the flow as they say.


 On arrival at Gulfoss...............where's this huge icy waterfall then??
The answer was in a huge crack in the ground just over the horizon....


.............and just down the sheet icy road.......................and many of Iceland's roads look like this.........
 

....Geysir, and the sunshine starts to appear.......................
 
 
.....wait for the last coach load to be herded away reluctantly........they missed the best views.


The hot springs melt the snow and Geysir erupts roughly every 8 mins in varying degrees.
 
With the weather improving and also the condition of the roads, we headed back to the hotel for an early start in the dark the following day and a long drive.......
 
 
Around half-way there along the South coast at 10am dawn arrived and it promised
to be a beautiful day.
 
What we hadn't really expected although made a lot of sense was the quality of light - it was like the golden hour all day long as the sun stays low on the horizon.


As we turned off the main road and down a very small track of ice towards a lagoon, we weren't sure if we could acutally drive to this place and there was certainly no way to turn around.......there was a point where the lagoon water/ice was lapping over both sides of the track a bit like a tidal causeway, which had us worried.
 
 
Looking back from across the lagoon...........
 
 
Then we came to the end of the road, stepped out of the car and the scenery was awesome.....


I'm guessing that it's not always like this - the strong winds on the day following the storm had whipped up the sea and spray and it's hard to convey quite how deafening the sea was.


We left reluctantly as we had further to go, and headed back to the main road and around to the other side of the headland......and Vik.  Here we find a very small community huddled behind a volcanic beach.  The contrast of the snow against the black sand was unusual.
The dunes, the dead grasses and the black beach.................. 


.........and Gill nearly had an icy bath for the second time that day..........
 
 
.......and then heading back towards Reykjavik, the waterfalls.....these are easily accessible from the main road and therefore tend to have herds of tourists on coach tours so pick your moment.....
 
 
........and the only photograph of Team Catchlight standing precariously on the ice at the base of Skogafoss.


Then on down the road to Seljalandsfoss.  We didn't think that the sun would ever get onto this waterfall in February so we didn't wait around.  It's not nearly as impressive as the previous one, but still worth a look since we were passing.
 
 
On the road towards Reyjavik as the sun disappears......

With hindsight, having spent our final night in Reykjavik, we could have stayed somewhere a little more interesting and maybe crammed in another detour on the way to the airport, but not having been there before, we weren't to know this so we made the best of it and ventured out in the dark.


 The following morning and we're back to grey skies and icy winds so we headed to the Blue Lagoon, which may be touristy, but really shouldn't be missed, and it's on route to the airport.
 
 
In summary - three things:
1. We went to see the Northern Lights
2. We failed to see the Northern Lights
3. We were lucky with the weather and captured some great scenery.
 
Conclusion:  We need go again!  Iceland is huge and we only saw a very small percentage of it.